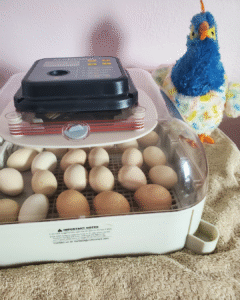
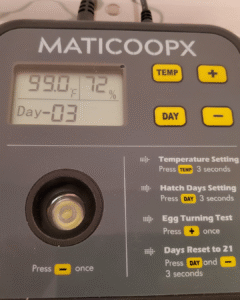
When we moved to the farm, I was having a hard time deciding how I wanted to accumulate chickens. Did I want to buy chicks from the store, buy chicks from a hatchery, buy chicks from a local breeder, hatch my own chicks or buy older chickens who were already laying. Do you see my dilemma; there were just way too many choices. In high school, I worked at a feed store and was the “Chick Days” organizer. So this has been a dream of mine for a long time but now I just couldn’t decide! Then the avian flu outbreak blew up in February. Who knew that if you dilly dallied for more than 5 minutes you wouldn’t be able to get chicks or even hatching eggs for that matter until May at the earliest!! Okay, okay… a slight exaggeration but not by much. If you’ve been following it at all, you know! It is absolutely nuts out there surrounding all things chickens. Anyways, I was out of luck to get anything ordered until late spring. So we started searching locally. Long story short, my grandparents had some amazing neighbors who had fertilized chicken eggs and hooked us up with 28 eggs for our incubator! We were so excited we could hardly wait for the eggs, let alone waiting 21 days until they hatched!
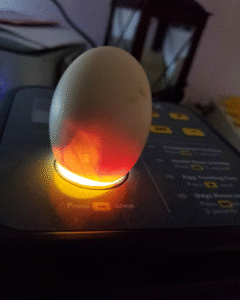
That first week the eggs were in the incubator was one of the longest weeks of my life! I didn’t know you could stare at eggs so much. And I knew there was nothing happening that I could physically see but there was just something that was so intriguing about the eggs sitting in the incubator. At day 7, we candled them and I was speechless. You could literally see the little chick embryos swimming around and lots of veins. It gave me goosebumps. Remember I said it had only been 7 days in the incubator! Crazy! We only candled 5 out of the 28 eggs. I was a nervous mother hen already and didn’t want them out of the incubator too long. You know when you do things for the first time you tend to follow every “rule” to a T. Then after you’ve done things a few times, you get more comfortable and don’t follow the rules as closely. Anyways, back to my story.
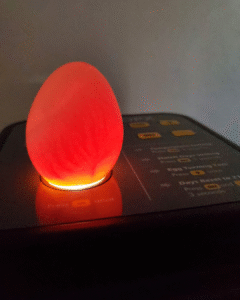
At day 14, week 2, we candled the eggs again. This time we candled every egg. Some of the eggs were very dark – like they were full – of a CHICKEN! We even got to see some feet and I’ve heard sometimes you can see their beaks too. It was insane. There were 5 eggs that looked very clear and empty. However, that mother hen came out again and I wanted to leave them in the incubator just in case I was wrong. I laugh about it now.
On to that 3rd week, 3 days before the hatch day, we had to “lock it down”. This is when you increase the humidity and do not open the incubator. This is the signal to the chicks that it is time to hatch. Can I pause for a moment to say how amazing a broody mama hen is? Like seriously, there isn’t anyone turning her eggs or telling her when to turn them or how far to turn them, etc. Mother nature is amazing.
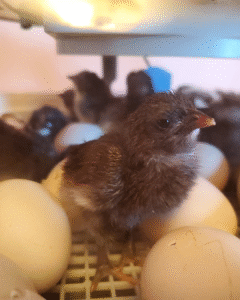
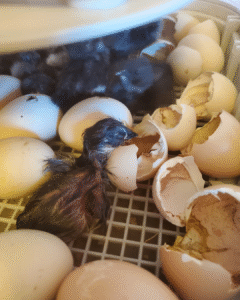
Sorry, I’m getting side tracked. So that final week, we do the lock down. On day 20 of 21, we had eggs starting to hatch!! I came into my office where the incubator was and did a quick peek inside. Then I had to look again because I saw it, the smallest little “pip” or hole in the shell! A little baby chick was starting to hatch. I just stood there and stared when all of a sudden, I heard chirping! Was I hearing things? Nope! I heard a little baby chick chirping! I couldn’t get to the rest of my family quick enough! I was yelling for them to “come quick”! Talk about waking everyone up! It took the first egg about 7 hours from the time it pipped to the time it hatched. I just kept checking but of course I still managed to miss the first one hatching. However, later that day, we were all able to witness one hatching. By that night, we had 4 fully hatched chicks and 8 more pipped. The next morning I awoke to 8 fully hatched and 8 more pipped. By that evening, we had a grand total of 18 chicks that had hatched. We left the remaining eggs in the incubator for a couple more days just to be sure we didn’t have a late hatcher.
What an amazing experience. I’ve cleaned the incubator now but I have an extremely strong urge to put more eggs in. So we will have to see what I come up with. If you ever get the opportunity to incubate eggs, you should!
Tips for Caring for Freshly Hatched Chicks
Here are some tips for caring for the chicks immediately after they’ve hatched.
- Try not to assist chicks hatching unless they have been pipped for 24 hours and are making no progress.
- Do not open the incubator while you have chicks that are actively hatching. By opening it, the humidity quickly dissipates and can cause the egg lining to shrink wrap around the baby chick. This makes it much more difficult if not impossible for the chick to hatch.
- Leave the hatched chicks in the incubator until they are fully dry. Right before they hatch, they consume the last of the egg yolk (their food source). This provides them energy to be able to break out of their shell and for a couple days after they hatch. They can stay in the incubator for up to 48 hours after they’ve hatched. Once they are dry, move them into the brooder (a small confinement space to keep baby chicks in – whether it be a stock tank or an actual brooder). You want the brooder to be very warm. But also allow a space where they can move away from the heat if it is too warm for them. Chicks that are freshly hatched up to a week old will need a temperature of 95 degrees Fahrenheit.
- You will want to give the chicks warm sugar water immediately after bringing them out of the incubator. You can make this by using a quart of warm water and mixing in a teaspoon of sugar. This will help them get some energy again. You will want to dip their beaks in the water so they get it in their mouth and know where it is. After a day or so of sugar water, switch to putting electrolytes in their water. I continue putting electrolytes in their water until they are almost full grown.
- Provide chick starter food for them to eat as soon as you move them to the brooder. They will sleep a lot those first couple of days but you want to always have food and water available.
- Don’t handle your chicks too much that first week. They are still delicate and need to rest to get stronger.
- You will want to observe your chick’s butt daily to be sure there isn’t dried poop that is preventing them from being able to go poop. The term is “pasty butt”. If they have dried poop plugging their vent (butt), then you will need to clean it off. Use warm water to soak the area using a cotton ball or rag. A friend told me another tip to help prevent pasty butt is to spray a little bit of olive oil on their feed. When I fill their feeder, I put one squirt in each feeding hole. I did this for their first week and I’ve had no pasty butt issues!
- You will also want to watch your chick’s eyes. I had one chick who’s eyes were crusted shut. Over the course of a couple of days, I used a q-tip to clean the eye very gently with warm water and saline solution. When it continued to happen, I applied a very little amount of coconut oil to it and that drastically helped.
- Observe your chicks at least 10 minutes a day. By observing them, you will know what their ‘normal’ behavior is and will catch when things aren’t right faster. This ultimately helps you start treating earlier giving the best outcome for you and your chick. This is also a great practice to continue even when your chicks are adults.
Enjoy! It is okay if all you want to do is stare into the incubator. It is not every day that you will have this experience so enjoy it while you can. Happy Hatching!
Pips, Chirps, and 1st Chick Hatched Video
Chick Hatching Video