I want to share my process for hand milking my dairy cow so that it will help you establish your own personal hand milking routine. It will take trial and error to figure out what works for you and your cow. But once you figure out a routine, cows just want consistency. Be consistent and you will have a great milking experience every time! Here is my process:
- Gather the following supplies: milk can with lid, milking bucket, washing bucket with warm water and rag, dry rag, and mineral oil.
- Go to the barn and prepare the milking area.
- Clean up area
- Add new straw or wood shavings if needed to cover any wet areas
- Prepare grain
- Prepare hay
- Use grain to get mama & baby tied up.
- Brush off mama to get any loose straw or hair off of her. By doing this, you prevent things falling into the milk.
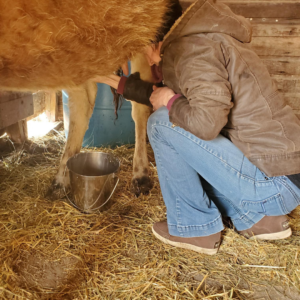
- Using the wet rag and warm water, wipe down her udder and each of her teats. There may be times when it will take more than one rag to clean her good. Use as many rags as needed to make sure she is nice and clean. Don’t double dip rags in the water. Your goal is to keep things as clean as possible. Also use the water to wash off your hands as well right before you milk.
- Put a little mineral oil on your hands and lightly coat each teat. Then squeeze each teat 3 times to clean out anything that may have gotten up in the teat. Squeeze this milk onto the ground or into a separate container to give to another animal. You don’t want this milk in your milking bucket.
- You are ready to milk! You will get into your own rhythm as far as which teats you start with. I personally start with the front teats until I have them stripped out and then I will work on the back teats. I also empty my milk bucket several times into the milk can that has a lid. I do this in case mama kicks or picks up her foot and poop falls in. That way I don’t lose all of the milk (been there, done that).
- The longer I have been milking, the easier and faster it has been. Allow yourself time. Give yourself grace. That first week is the hardest. You may only be able to milk one teat at a time. It may take an hour or more. You may have more straw in your milk than you’d like. You may have more milk on your pants and shoes than you do in your bucket. Your hands and back may hurt. I state all of these because they ALL happened to me. It is OKAY! I repeat it is okay. This is how you learn. It is recommended that you give the cow about a week after calving before you start drinking the milk. This allows time for the colostrum to leave her milk supply. You still need to milk her in that first week but you can save all of this milk and freeze it to have on hand. However, I also believe this gives you a week to get practiced up and to get better before you collect the milk to drink.
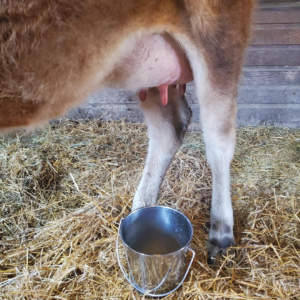
- That first week or two, your mama’s udder will still be very swollen and she will be very full. When I milked, I would milk just until her udder was “soft” again. It helps to feel before you start milking so you know how firm she was to start with. Also, I am milking twice a day currently, about 12 hours apart. Around 6 weeks, I am going to work on switching to once a day milking since we are calf sharing. More on that in a later blog.
- Once the swelling goes down in mama’s udder, you will then milk until you strip out each teat. What does that mean exactly? You will know once you feel it. Her teats fill again after you squeeze out the milk. However, as you begin emptying her udder, the teats will fill with less and less milk. Before long, you will get very little milk out or maybe none at all. Her teats feel like an empty water balloon. This means you’ve stripped it out. If you are calf sharing, you don’t necessarily have to strip each time because you have baby there to be your backup. However, keep in mind her body will make more or less milk, depending on what is being “requested” (by you or by the calf).
- Once I’ve stripped each teat or to the point where I want them for baby, it is then time to do one final squeeze out of each teat. Make sure you fully empty each teat.
- Once you’ve completed milking, I then take the clean, dry rag and wipe off each teat. I like to make sure there is no residual milk left on her teats. The first couple days after calving, I did put a little more mineral oil on her teats to help with any soreness or dryness. You can also use Udder Balm but baby may not like the smell of that which is why I switched to mineral oil (thanks Grandpa & Grandma for that suggestion).
- Untie baby. Give mama the rest of her grain and untie her.
- Take milk and supplies back to the house.
- Gather the jars that you are filtering the milk into. Assemble the filter and strainer. Filter the milk, label the jars, and put the milk in the fridge. We want the milk to get chilled as quickly as possible so I usually place in the back of the fridge where it tends to be a little bit colder.
- Wash all of the buckets and containers with a mild soap. Let them air dry until your next milking.
Happy Milking! Remember to relax and enjoy!
Hand Milking Supplies
If you are looking for milking supplies, here is where I got mine. Also, Shenandoah Homestead Supply has quite a few other supplies that may interest you.
- Milk Tote w/ lid – MilkMeister Stainless Steel Milk Can Totes (10 L) w/ lid
- Strainer – Medium Stainless Steel Strainer for Large Mouth Jars
- Filters for strainer – Milk Filter Disks
- Bucket I use for water to wash off udder – 2 qt Heavy Flat Bucket w/ 2 hooks
- Bucket I use to milk into – Advance Pet Heavy Stainless Steel Bucket 6 qt
- Rags – I cut up old flannel sheets into rags. You can also use old t-shirts or cotton sheets.
When I was looking for my milking buckets, I wanted them to be stainless steel and have the least amount of ‘cervices’ that can be hard to clean and result in a place to harbor bacteria.
Hand Milking vs Machine Milking
You might be asking why in the world I would want to hand milk when I could have a machine do it. This is the 21st century after all. I can only speak on this based off of my own opinions since I have not milked with a machine. The two main reasons:
- A milking machine may be faster than my hands, but there are more things to wash. And with that, there are more cervices that can accumulate bacteria. It also sounds like it takes the same amount of time using a machine and doing the cleanup verses hand milking and doing the clean up. Now, all this being said, I have one cow. If I had more, maybe a machine would make more sense. But then again, my grandparents milked quite a few cows, all by hand.
- Dairy cows are more susceptible to mastitis with a machine. When I hand milk, I am very in tune with my mama cow and what her udder feels like through the whole process. A machine just sucks.
Again, this is my personal preference. Do your research and make the right choice for you but don’t be afraid to try the more ‘rustic’ method of hand milking.